Tuesday, April 2, 2013

How to create a Stitched Panorama

Want to try this effect for yourself? Let's show you the way...

LEE FROST: Feeling inspired to give this technique a go? Although you may think that creating successful stitched panoramas is difficult, it's actually very straightforward providing you stick to a consistent working routine and don't make any silly mistakes along the way. Here, I'll show you how to create a stitched panorama using Adobe Photoshop CS3. First things first, grab your camera...

1. Set up Mount your camera on a tripod in either landscape or portrait format. Make sure the tripod head is level on the legs (a levelling base helps enormously) and also that the camera is level on the head by using a hotshoe spirit level, so that when you rotate the camera between shots it remains level.

2. Test shot Take an exposure test shot from an average part of the scene - not the lightest or darkest. Check the image and histogram; if it looks okay, set this exposure in manual mode. Also switch White Balance from AWB to the preset that suits the conditions. Swing your camera to the left, ready to create the first shot.


3. Start the sequence Focus the lens manually on the scene and make sure the aperture you use will give sufficient depth-of-field to record everything in sharp focus that needs to be sharp - f/8-f/ll is usually fine. Hold your left hand in front of the lens with your finger pointing right and take a shot; this marks the start of the sequence.


4. Overlap your shots Remove your hand from in front of the lens and take the first shot in the sequence. Immediately swing the camera slightly to the right and make your second exposure. Repeat this until you reach the other end of the scene, making sure you overlap each image by 30-40% to enable easy stitching.


5. End the sequence Hold your right hand in front of the lens with your fingers pointing to the left and take a shot to denote the end of the sequence. When you download the files, you'll know that all the images between the two hand shots are in the same sequence and it will be obvious which ones need to be stitched.

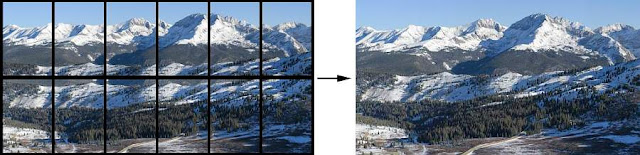
6. Batch-process Download the images to a computer. If you shoot in Raw, open all the files for the stitch together, select All and click Synchronise, so they all receive the same adjustments to exposure, colour temperature, contrast and so on. It's essential that all the images are consistent otherwise the stitch will look odd. 

7. Select your layout Put the processed images in a folder so they're in the same place. Next, open Photoshopand go to File>Automate> Photomerge. Select the layout style you want to use - Auto usually works fine, but Cylindrical and Perspective are worth trying. Then click on the Use tab, select Folders then click on Browse.

8. Employ Photomerge Click on the folder containing the images you want to stitch and they'll appear in the Photomerge dialogue box. Click OK and let Photomerge perform its magic. This can take a few minutes, as a series of layers are created and Photomerge decides which bits of each image it will blend together.

9. Flatten image Once the stitch is complete it will look something like this. If the camera wasn't level as you rotated it, you will need to crop the top and bottom edges to straighten them. The file size will be huge, especially if the source images were saved as TIFFs. To reduce it, go to lmage>Layers>Flatten Image.

10. Check for seams Enlarge the image on screen to 100% and scroll around it to check that there are no obvious joins where the images meet. If there are, use the Clone Stamp Tool or Healing Brush Tool to lose them, though if you overlapped the source images enough, you should find that the stitch is seamless and looks fantastic.

Stitching Softwares:
There are various stitching applications available - here's a rundown of the most popular...

Adobe Photoshop
If you're using Photoshop, Elements or Lightroom, you can stitch images together using the Photomerge function as described on this page. It's quick, easy and effective. Prior to Photoshop CS3 it wasn't so good, but from CS3 on, it does an excellent job. For PC & Mac.
Cost: Free with Photoshop and Lightroom. Visit: www.adobe.com

PTGui
(Panoramic Tools Graphical User Interface) Available for both Mac and PC, PTGui is far more capable than Photomerge, allowing you to stitch multiple layers of images, create 360° cylindrical pans, 360x180° spherical pans, HDR pans, gigapixel pans from hundreds of source images and more. The latest version offers an Align to Grid feature that makes it easy to stitch multiple layers, plus you have manual control to fine-tune images when they're stitched. Cost: €79 for PTGui, €149 for PTGui Pro Visit: www.ptgui.com

PanaVue Image Assembler
Similar to PTGui in that it offers automatic and manual stitching, corrects lens distortion and misalignment, can handle multi-layer stitches and lxlm pixel stitches, offers automatic cropping, single-step 360° image wrapping, stitches handheld sequences and creates dramatic vertical pans. PC only. Download a free trial.
Cost: S64 Std Edition; $129 Pro Edition.
Visit: www.panavue.com

Panoweaver 8
A good choice if you want to create cylindrical or spherical pans and use them for VR viewing using HTML 5, Flash VR, QTVR and other platforms. You can also use it to create Little Planet images, stitch multiple rows, handle images shot with full-frame fisheye lenses (for spherical pans), create HDR pans to handle exposure/contrast issues and much more. PC and Mac.
Cost: $99.99 Std Edition.
Visit: www.easypano.com

Arcsoft Panorama Maker 6
Relatively inexpensive and easy to use, it offers five stitching modes: Auto, 360°, Horizontal, Tile and Vertical - just select the one you want then choose your images. You can create panoramas from stills and video, create 360° virtual reality movies,
3D panoramas, export the pans in a range of formats, adjust colour balance, exposure and dynamic lighting. PC only.
Cost: $79.99.


For The User 

******Usman ahmed owner of this blog created this post with his knowledge.All content provided on this blog is not copied from any other blog and site and is for informational purposes only and  The owner of this blog makes no representations as to the accuracy or completeness of any information on this site or found by following any link on this site.The owner will not be liable for any errors or omissions in this information nor for the availability of this information. The owner will not be liable for any losses, injuries, or damages from the display or use of this information.

Essential gear for Panoramas

Although there are many specialist bits of kit available forpanoramic photography, you don't necessarily need any of them - it just depends on the type of panos you shoot.

Camera: Any DSLR can be used for panoramic photography and even if it's a relatively old model with modest megapixels, by the time you've stitched half a dozen or more images together, the file size will be BIG! Digital compacts can also be used, and even the camera in a mobile phone - there are now apps available for iPhones and other smartphones that will take a series of frames and stitch them for you in-phone!

Lenses:  Technically, any lens or focal length can be used to shoot the images for a stitched panorama. That said, you need to take care when using wide-angle lenses because the monstrous field-of-view they offer, coupled with the distortion inherent in wide lenses, can result in a rather bulbous stitch that requires serious cropping to get the top and bottom edges level. Parallax error is also more of an issue with wide-angle lenses as you're likely to have features in the composition that are close to the camera (see panel on parallax error, above). A zoom with a focal lens range equivalent to 24-70mm is ideal for stitched panos. The wider end is ideal for urban/architectural panoramas while the rest of the range is well suited to landscapes. You can use longer focal lengths quite happily, but distortion can be an issue if you go wider than 24mm, plus the exaggerated perspective will make everything in the scene appear miles away.

Tilt & shift lenses: If you're serious about panoramic photography, especially of urban views - it might be worth investing in a tilt & shift (TS) lens. The main use of these specialist lenses is to allow you to keep the camera perfectly level and square then raise the front section of the lens to get the tops of the buildings in the shot.
Not only will this prevent converging verticals, but also g ive you a much neater stitch as there won't be any distortion in the sequence of images you shoot. Another way to use a TS lens for panoramic photography is to set up the camera, 'shift' the lens as far to the left as it will go, take a shot, shift it as far to the right as it will go, take a second shot, then stitch the two together. Tilt & shift lenses aren't cheap - the Canon TS-E 24mm f/3.5 LII costs £1,700, the TS-E 45mm and 90mm f/2.8 lenses are £1,120 each, and the TS-E 17mm f/4 is almost £2,000.

Tripod & levelling base: Any solid, sturdy tripod will do the trick, but a handy accessory worth considering is a levelling base. Gitzo, Manfrotto, Acratech and other manufacturers make them - the £125 Acratech model (www.bobrigby.com) is ideal. Basically, the base fits between your tripod head and tripod and allows you to get the tripod head perfectly level, even if the tripod itself isn't, using a 'half cup and bowl' design and a bullseye bubble on the base. Once the tripod head is levelled in this way, it will remain so as you rotate it to shoot images for stitching.

Spirit level: As well as a levelling base, a hotshoe-mounted spirit level is also essential as it allows you to level the camera on the tripod head. If you don't have a levelling base, you can also use the hotshoe spirit level to check that it's still level as you rotate the camera between shots.

Nodal rail: If you mainly shoot panoramic sequences in urban locations or inside buildings, then parallax error is going to be an issue that needs addressing. The easiest way to do that is by investing in a nodal slide/rail such as the £175 Acratech model (www.bobrigby.com) so you can adjust the position of the camera in relation to the tripod head, and rotate it about the entrance pupil. You don't need a nodal slide for landscapes as parallax error isn't usually a problem.

Parallax error
The main technical issue you have to face when shooting panoramas is parallax error. This is caused when you rotate the camera between frames and the alignment of elements in the scene changes slightly so the frames don't line up perfectly in stitching. The wider the lens focal length is, the more obvious parallax error is. Today's stitching software can usually correct parallax error, and it's only really an issue if elements in the scene are close to the camera; often the case when shooting wide-angle urban views, such as market squares or building interiors. For landscapes, it's rarely a problem.

If you do need to correct/avoid parallax error, set up the camera so that it rotates around its optical centre (often incorrectly referred to as the 'nodal point'; its proper term is the 'entrance pupil'). The easiest way to do this is with a flat adjustable bracket - a 'nodal slide' - allowing you to adjust the position of the camera in relation to the tripod head so that instead of rotating the camera from its baseplate, you can rotate it around the entrance pupil.

To find the entrance pupil, place two poles in the ground lm apart, then set up your camera on a nodal slide and tripod in front of them so the front pole hides the rear one. Make sure the camera is level, then take three shots: one with the poles in the centre of the frame, one with them to the right of the frame and one with them to the left of the frame. If the rear pole can be seen to the left of the front one on shot two and to the right of the front one in shot three, the camera is too far back on the nodal slide. If the rear pole appears to the right of the front one in shot two and to the left of it in shot three, the camera is too far forward on the nodal slide. Either way, adjust the position of the camera on the nodal slide and take the shots again. When the two poles remain in line, you've found the entrance pupil of that lens or focal length setting, and you should reference it on the slide. Do the same with all your lenses.


For The User 

******Usman ahmed owner of this blog created this post with his knowledge.All content provided on this blog is not copied from any other blog and site and is for informational purposes only and  The owner of this blog makes no representations as to the accuracy or completeness of any information on this site or found by following any link on this site.The owner will not be liable for any errors or omissions in this information nor for the availability of this information. The owner will not be liable for any losses, injuries, or damages from the display or use of this information.

Creating planet panoramas

How to create shots that will get your head in a spin...

LEE FROST: One of the most exciting panoramic techniques is the creation of 'planet' panoramas where it appears you are floating above the earth's surface with a fisheye lens on your camera and looking down. They're weird, wonderful, eye-catching and arresting, and best of all you only need Photoshop to create them . Planet panoramas start life as simple 360° panoramas, but it’s what you do to them afterwards that makes all the difference. Here's a quick guide so you can have a go.
Working with existing images

You don't have to shoot 360° panoramas to create planet pans - you can work from existing pans that don't have such extensive coverage. What you need to ensure is that the horizon is perfectly level, so open the image, go to View>Show>Crid to put a grid over the image then use lmage>lmage Rotation to rotate the image and get the horizon level. You can then crop the image accordingly, ideally with the horizon in the centre of the frame.

The left- and right-hand edges also need to meet perfectly, so make sure either you have an empty horizon at either end of the shot or the features are the same height so they match up. Once you've done that, repeat steps six to eight below and transform your conventional image into an amazing planet panorama! Urban views with buildings breaking into the sky work particularly well.

1. Pick your location: Choose a scene where the bottom 20-25% of each image is fairly plain - grass, water, sand on a beach and paving are ideal. This area forms the centre of the planet pan and also gets distorted more than any other area, so it works better if it's plain.

2. Wait for a plain sky: The scene should also be relatively plain in the top 20-25% - cloudless sky is ideal - as this area will form the outside edge of the planet pan. If it's complicated it will look odd. Wait fora sunny day when the sky is blue for the best results.

3. Centre the horizon: The horizon must be in the centre of the frame. Why? Because the left-hand and right-hand edges of the 360° pan will meet when you create the planet pan, so if the horizon isn't central, it won't meet and you'll have a big crack in your planet!

4. Set up: Having found the right scene, set up your camera as explained on the previous page and prepare to shoot a conventional 360° panorama. As the coverage is so great, it's crucial that the camera is set up level, so be sure to use a spirit level.

5. Stitch images: Download the source images to your computer then stitch them together using whatever stitching software you use. Once the stitch is complete, crop the top and bottom edges as required, flatten the layers and save.

6 Set height and width: In Photoshop, go to lmage>lmage Size and uncheck Constrain Proportions. Next, set the height of the image to the same size as the width to distort it, then go to lmage>lmage Rotation and rotate 180°.

7. Create your planet pan Go to Filter>Distort> Polar Coordinates and in the dialogue box choose Rectangular to Polar. This will transform the image and create the striking planet effect you're after. Cool or what?!

8. Rotate and clean up Rotate the planet until you're happy using lmage>lmage Rotation>Arbitrary. If the join between the two ends isn't perfect, clean it up with the Clone Stamp Tool, then adjust colour and contrast.

Handheld panoramas
Although we've advised you to mount your camera on a tripod, with care it's possible to shoot handheld. The key is to ensure that you keep the camera level as you pan it from left to right, so the images stitch together well and you don’t have to crop the top and bottom too much. If your camera has a grid, use it as a guide to make sure each shot is level. If you don't have that, we recommend you shoot the images at a slightly wider focal length than you really need, so that if you do need to crop the final pan you won't lose important subject matter or end up with a really skinny pano! You also need to make sure the shutter speed you use is high enough to prevent camera shake and that you take your time shooting the sequence so you don't fudge a shot in the middle of it then find you can't stitch the images together. 


For The User 

******Usman ahmed owner of this blog created this post with his knowledge.All content provided on this blog is not copied from any other blog and site and is for informational purposes only and  The owner of this blog makes no representations as to the accuracy or completeness of any information on this site or found by following any link on this site.The owner will not be liable for any errors or omissions in this information nor for the availability of this information. The owner will not be liable for any losses, injuries, or damages from the display or use of this information.

Picture Perfect Successful Panoramas

WHATEVER TYPE OF SCENE OR LOCATION YOU SHOOT, BE AWARE THAT MOVING ELEMENTS CAN CAUSE PROBLEMS

Top & left: Successful panoramas are those that are seamless so that no joins are visible between each frame - ensuring a 30-40% crossover of each shot will help with the stitching process.

Second, you need to overlap each frame with the last one so that the stitching software can find the most effective 'join' between the images. It doesn't stitch them using straight lines but by finding a path where it’s easiest to achieve a seamless blend, and the bigger the overlap, the easier this is. A good overlap to work to is 30-40%.
Whether you shoot with the camera in portrait or landscape format is up to you.

If you turn your camera on its side, the pixel depth of the panorama will be maximised and the output size of the image will be much bigger, so you can produce giant prints even with a fairly modest digital SLR. But if your camera has a resolution of ten-megapixels or more, shooting in landscape format will still give you enormous panoramic images. With the camera on the tripod, you need to decide where the panorama will begin and end. For landscapes you're unlikely to want to cover more than about 60°, but in urban locations or when shooting interiors, you could go for a full 360° pano - the results can look amazing.

It's not important to workout how many images you need to include in the stitch - just shoot as many or as few as is necessary to cover the area you want to capture.
White Balance should be set to a fixed value: outdoors, that's Daylight; indoors, you may need to use Tungsten or Fluorescent, depending on the type of lighting used.

What you shouldn't do is use AWB (Auto White Balance) because if you do, the White Balance may change from frame to frame so the images have a different colour shift and the software struggles to stitch them - or if it succeeds, the final pano looks odd. If you shoot in Raw and use AWB, you can obviously correct any difference in colour balance by batch-processing the files that


Top and left: Panoramas are usually easy on the eye because they allow you to take in a whole scene just as you would if you were stood looking at it in real life. Vertical panoramas are also incredibly easy to make with this technique. will be stitched and synchronising them to the same colour temperature. However, it’s easiest to set your camera to a fixed White Balance and if you shoot JPEG format, you have no choice.The exposure also needs to be the same for each image if the software is going to produce a perfect stitch, so avoid using a semi-automatic exposure mode, such as aperture-priority, and instead set the camera to manual exposure mode so the exposure doesn't change when you move the camera between frames. The easiest way to determine 'correct' exposure is by taking a test shot of an average part of the scene - not the lightest, not the darkest, but somewhere between those extremes. You can then set that exposure manually and use it for each frame in the sequence. It may mean that some frames appear overexposed and others under, but you can always apply selective exposure control once the final pano has been stitched.

Whatever type of scene or location you shoot, be aware that moving elements can cause problems. If you shoot in low light and have to use long exposures, blurring in the sky and sea or things like breaking waves may cause alignment problems. Similarly, urban scenes where there's moving traffic or people - or both. If in doubt, give it a try and see what happens. It may be that you have to do a little retouching in post-production, perhaps using the Clone Stamp Tool to remove unwanted or repeated elements, or to soften visible joins between images. The more experience you gain, the more straightforward these problems are to solve, so don't let the risk of them put you off trying. Stitching software is also more sophisticated than it used to be, so you may get away with including moving elements.

Set your lens to manual focus rather than AF, so it remains focused to the same distance and depth-of-field is constant. If you use AF, the lens may focus on a different distance from frame to frame because different elements will fall behind the AF point in use. If you're using a wide-angle lens stopped down to f/11 or f/16, you'll probably have enough depth-of-field to overcome this, but if you're not, you may find that the focus shift means some parts of the scene are sharp in one frame but not in the next, which makes a seamless stitch impossible to achieve. Finally, if you shoot a number of image sequences on the same memory card, how will you know where one sequence begins and another ends? The answer is to separate the sequences, and the easiest way to do that is by photographing your hand at the start and again at the end, so the image between the two hand shots are for one stitch. Better still, photograph your left hand at the start with fingers pointing right and your right hand with fingers pointing left at the end.

Left and above: Planet panos and spherical panos are probably the most striking of all panoramas for their weird and wonderful take on a scene. They’re definitely a talking point!

SET YOU R LENS TO MANUAL FOCUS, SO THAT IT REMAINS FOCUSED ON THE SAME DISTANCE AND DEPTH-OF- FIELD IS CONSTANT.


For The User 

******Usman ahmed owner of this blog created this post with his knowledge.All content provided on this blog is not copied from any other blog and site and is for informational purposes only and  The owner of this blog makes no representations as to the accuracy or completeness of any information on this site or found by following any link on this site.The owner will not be liable for any errors or omissions in this information nor for the availability of this information. The owner will not be liable for any losses, injuries, or damages from the display or use of this information.

The complete Picture Panorama

IT'S AMAZING WHAT CAN BE ACHIEVED WITH JUST YOUR CAMERA AND A SPOT OF PHOTOSHOP. PANORAMAS ARE SO SIMPLE TO CREATE THAT YOU'LL FIND YOURSELF USING THIS TECHNIQUE AGAIN AND AGAIN ONCE YOU KNOW HOW... IMAGINE YOU'RE GAZING out over a breathtaking vista. You don't have a camera with you this time, just your eyes. How do you appreciate the view? Do you stand glued to the spot, looking at one part of it or do you slowly swing your head from side to side to take in the whole of the vista in one fell swoop and allow your brain to process it as a single majestic memory?

The answer, of course, is the latter. Whether we're admiring the landscape or looking down the street, we instinctively pan’ our heads from left to right to analyse the scene because this is far more effective than looking at a single part - just like a completed jigsaw is easier to understand than one with lots of pieces missing.

It's the same with photography. Creating dramatic and meaningful scenic images in a single frame is a big ask because so much of the view is left out. How many times have you downloaded a set of landscapes onto your computer only to be disappointed because they didn't really capture the drama and beauty of the scene? It's not that you're a bad photographer, but simply because your brain took in far more of the scene than your camera did. And if the images fail to impress you when you were actually there to see the scene for real, imagine the poor viewer who only has the small section of the scene you captured with your camera to work with!


Sphere we go!
Panoramas take on a mind- bending life on their own when you turn them into 360° panos - a simple Photoshop technique will do all the hard work for you.

IF YOU HAVEA DIGITAL CAMERA, YOU HAVE THE MEANS TO CREATE PANORAMICS,AND THOUGH YOU MAY THINK THE PROCESS IS COMPLICATED AND HIGHLY TECHNICAL, NOTHING COULD BE FURTHER FROM THE TRUTH.

Panoramic photography gets around this problem by allowing you to capture scenes in the same way your eyes scan them and your brain interprets them. The elongated 'letterbox’ format forces the eye to scan across the image, taking it in bit by bit rather than in a single hit, and psychologically this is just like looking at the real scene.

In the distant days before digital technology took over our lives, panoramic photography required the use of specialist (and expensive) cameras such as the Fujifilm GX617 or Hasselblad XPan. Some models of panoramic camera are still made today, and some photographers still use them, thinking they offer the ultimate solution. Unfortunately, they're living in the Dark Ages, because when it comes to creating dramatic 'panos', a digital SLR beats a panoramic film camera hands down due to its versatility.

Panoramic cameras were/are limited to a single format, but because digital panoramas are created by shooting a series of overlapping frames and 'stitching' them together with software, you can vary the field -of-view to suit each situation: sometimes you may only shoot two frames, while others you may shoot six, 12 or 20, or keep going until you've covered a full 360°. You also have a much wider choice of lenses for a digital SLR and can use any of them to create a digital pan, from wide- angle to telephoto, whereas panoramic film cameras tended to have either a fixed lens or a limited range of three interchangeable lenses.

In a nutshell, if you have a digital camera, you have the means to create panoramics, and though you may think the process is complicated and highly technical, nothing could be further from the truth.

Be prepared
The key to success with creating digital panoramas is planning. The latest stitching software is capable of amazing results, but only if you give it a set of images that it can make sense of, and for that to happen you need to be aware of certain factors.

It's a good idea to mount your camera on a tripod so you can level it properly, and keep it level as you rotate it between frames. In low light, it also means you won't need to worry about camera shake. If the camera isn't level then you'll end up having to crop quite a bit off the top and bottom of the final stitched image and this could mean that you lose important subject matter, such as the top of a building.

In-camera features
If you can't be bothered to stitch images, consider buying a camera that can do it for you. The latest innovation is Sweep Panorama, found in DSLRs such as the Sony A37 and A65, and compacts such as the Sony NEX-7, NEX-5N and Fuji X-Pro 1. Press the shutter while panning the camera across a scene in one smooth swing and it automatically takes a series of frames then stitches them in-camera. It's a simple way to create great panoramas, but you need to make sure you 'sweep' the camera slowly and smoothly, especially in low light, otherwise your images could be blurred.

You also need to keep the camera horizontal to avoid wonky panoramas! The Panasonic TZ30 has a similar mode, as does the Samsung WB850 and ST200F. Other digital compacts have panoramic modes that stitch frames in-camera, or you get software with the camera allowing you to stitch the images in post-production.


For The User 

******Usman ahmed owner of this blog created this post with his knowledge.All content provided on this blog is not copied from any other blog and site and is for informational purposes only and  The owner of this blog makes no representations as to the accuracy or completeness of any information on this site or found by following any link on this site.The owner will not be liable for any errors or omissions in this information nor for the availability of this information. The owner will not be liable for any losses, injuries, or damages from the display or use of this information.

Types of Panoramic Images

Thanks to digital technology with panoramic images, you can push the boundaries of panoramic photography to new limits and experiment with creative ideas. As well as conventional landscape- format panos, why not have a go at shooting vertical panos?

¦ VERTICAL The only difference between vertical and horizontal panos is that you shoot a sequence of frames starting at the ground and working up - ideal for tall buildings and monuments - rather than left to right. Avoid using a wide-angle lens for vertical panos.

The distortion and stretching of perspective is almost certain to make the stitch impossible to complete, or at best you'll end up with a very weird shape because elements in the first frame will appear much larger than those in subsequent frames as they're further away from the camera.

¦ SPHERICAL: Spherical panos cover a full 360° along the horizontal axis and 180° along the vertical. They're mainly used for virtual-reality applications and 
intended to be projected on the inside of a sphere to correct the distortion. You can use a fisheye lens to achieve the 180° vertical coverage in one hit, and shoot three or four images along the horizontal axis with it to cover 360°, but you're more likely to have an ultra wide-angle lens in the 14-15mm range (full-frame).

To create a spherical pano with that, all you need to do is shoot two rows of images along the horizontal axis - one with the camera tilted up and the other with it tilted down, overlapping at the horizon. If you use this method, any stitching software should be capable of merging the images, though PTGui, REALVIX Stitcher and PanaVue Image Assembler are recommended.

¦ CYLINDRICAL: These usually also cover 360° on the horizontal access, but don’t cover 180° vertically like a spherical pano. They tend to be used to take you on a 'virtual’ tour of building interiors, market squares and so on with the aid of applications such as Flash Player, QuickTime and Java. You can view and print a cylindrical panorama as a flat object, but horizontal lines appear as curves, giving an 'end of the world’ effect. Panoramic cameras with a rotating lens such as the Noblex or Horizon also create this effect.

¦ CUBIC: The problem with spherical panoramas is that they suffer from distortion to the horizontal and vertical lines. Cubics overcome this by using six images that represent the inside faces of a cube, so each image is distortion-free. To create a cubic image of a room, for example, you could shoot each of the four walls head-on, then look directly up at the ceiling then down at the ground. The images are then arranged in the correct order as a 'cross’ so that software such as QuickTime VR can display them.

¦ PLANETS: Of all the weird and wonderful panorama techniques, this is the easiest but by far the most striking. All you do is take a 360° horizontal panorama, make a few quick changes to it in Photoshop and voila - you end up with a circular image that looks like you levitated above the earth's surface and captured it with a fisheye lens. Turn to page 96 to learn how to create your own planets.

¦ GIGAPIXEL PANORAMAS: One of the benefits of being able to stitch digital files together is that the resolution of the final image is increased. Gigapixel panoramas take this idea to the extreme by combining dozens of images - hundreds in some cases. A long telephoto lens is used to capture small sections of a scene, like pieces in a jigsaw puzzle. For the best results, a robotic panoramic head such as the Gigapan Epic Pro(£810) is used so that the images are precisely spaced in columns and rows. Software such as PTGui can stitch gigapixel images, but make sure your computer has plenty of RAM!


For The User 

******Usman ahmed owner of this blog created this post with his knowledge.All content provided on this blog is not copied from any other blog and site and is for informational purposes only and  The owner of this blog makes no representations as to the accuracy or completeness of any information on this site or found by following any link on this site.The owner will not be liable for any errors or omissions in this information nor for the availability of this information. The owner will not be liable for any losses, injuries, or damages from the display or use of this information.

Shoot a Sports Sequence

Photography with some basic Photoshop and solid shooting skills, you can create an image that reveals the full story of an action sequence - not just the climatic end or key moment but the whole thing. It's great for shooting sports like snowboarding, BMX riding or even your child attempting the long jump. One of the great things about sequence photos is how impressive they can look for how simple the technique really is. Once you learn what light is best and which kinds of locations and backgrounds work well, piecing together a masterpiece is simply a matter of following a few key steps. Like anything photography-related, a few important equipment requirements can help you pull off the shot, but if you know your camera inside out, the only limitation is your creativity.


The advantage movies have over stills is that you can use dozens of frames to convey an action or story; with stills, you have just one. Unless you use this clever technique... Pro sports photographer Tristan Cardewshows you how

The right location will go a long way; not only will it help your final image look awesome, but the right background can save you plenty of time in post-
production. The key is simplicity. Choose a background where your subject stands out; whether it's a sky or a plain, simple scene, it's important to keep your 'base image' uncomplicated. It's also important to bear in mind the safety of your subject, yourself and others. Don't shoot in crowded areas and have your subject wear a helmet if they're not feeling confident.
Once you've chosen your location, the most important factor is the light.

The quality of light is essential, but what you really want is an abundance of light so you can freeze movement with a fast shutter speed and still get a well-exposed image. A sunset may look lovely, but there won't be enough light to freeze any motion - unless you bring in flash, but that's another tutorial. Heavily backlit scenes will also be difficult to capture well in a sequence, unless you're intentionally shooting a silhouette. 

GEAR 
Having the camera locked off on a solid tripod allows each frame to fit together flawlessly in post-production. I use a Manfrotto 055XPROB with a Manfrotto 804RC2 three-way head.

It helps to also have a camera that shoots at least four frames-per-second to capture each step of the sequence. For this tutorial,

The camera used is Canon EOS-1D Mk III set to 6fps, and then selected the specific frames I wanted to use once I’d looked at them on the computer. It's important to use fast-writing memory cards (30M B a second at least) to ensure your camera's buffer doesn’t stop you shooting the whole sequence.

SET-UP 
Once you’ve chosen your location, angle and the right time of day to shoot, set up your tripod-mounted camera allowing enough space either side of the frame just in case your subject goes outside the expected area. To keep the background simple, I lowered the tripod so it was almost on the grass, filling more of the frame with the sky. Set your camera to manual exposure mode to ensure each frame is exposed the same, seta fast shutter speed (above l/500sec) and the smallest aperture the light will allow for decent depth-of-field; aim for smaller f/5.6 or I advise using a remote release, too, to avoid risking bumping the camera as you hold the shutter button down. If the frames don't line up exactly, you'll struggle to piece them together later in Photoshop.

TECHNIQUE 
Two of the most common errors with this technique are shutter speeds being too slow and apertures too wide to get the area you need in focus. This is why shooting when there's plenty of light is so important; you could raise the ISO rating, but you don't want to go much higher than ISO 400 as quality will deteriorate. If you don't freeze each frame, the blurred image will result in 'ghosting' or halos. With settings sorted, you'll need to focus on the middle area your subject will pass through. If your subject isn’t in frame to focus on yet, ask someone else to stand in position or place an object there to focus on. Once the lens is focused, switch to manual focusing and set the camera to burst mode. Now take a shot of the scene with no one in the frame: this is your background image. Now all that's necessary is for you to hold down the shutter button or remote release as soon as you see your subject come in to frame, and keep it depressed until they've left the frame to capture the entire action sequence. Repeat, if possible, to give yourself the best chance of getting the best action sequence. 

Finishing in Photoshop.

I. Open up all of your frames Open your background image, then select all the frames you want to use and open them together in Photoshop. Click on the first shot of your sequence and, using the Lasso Tool, loosely draw around the subject, then go to Edit>Copy.

2. Paste in your cut-out Click back on to the background image and go to Edit>Paste to add the cut-out. Use the Move Tool to position the cut-out so it lines up with the background image as best as possible. Use the arrow keys to make slight adjustments. Zooming into the image may help, too.

3.Repeat and add a Layer Mask Repeat the first and second steps with the next image from the sequence, drawing around your second step and pasting in the cut-out. This time, though, add a Layer Mask to the new image layer; click on the Add new Layer Mask button at the bottom of the Layers palette. 

4. Blend in your image Click on the Layer Mask and select the Brush Tool. Using Black paint, brush over the areas of the image you don't want visible. Switch to White paint to undo any mistakes. Use an appropriate-sized brush, with the Opacity set to 100% and Hardness to 85-100% to blend in the edges.

5. Add more images Repeat steps one to four with the rest of the images, paying careful attention to the edges of your subject; you want to ensure you leave no extra background around them, especially where they overlap. The cleaner the edges of each frame, the more professional the photo will look.

6. Finishing touches Once you've laid out the entire sequence so the photo looks natural and the movement of the subject looks like it flows, flatten your image (Layer>Flatten Image). Use Adjustment Layers (Layer>Newadjustment layer) to tweak contrast and saturation, and sharpen. Bingo! You have your first sequence. 


Do you have an interest in digital workflow photography, digital imaging infrared, photography workshops, digital stock, photo editing, macro or even forensic digital imaging and photography ?? go to photoforbeginners.com.


For The User 

******Usman ahmed owner of this blog created this post with his knowledge.All content provided on this blog is not copied from any other blog and site and is for informational purposes only and  The owner of this blog makes no representations as to the accuracy or completeness of any information on this site or found by following any link on this site.The owner will not be liable for any errors or omissions in this information nor for the availability of this information. The owner will not be liable for any losses, injuries, or damages from the display or use of this information.

Share with Windows Live Photo Gallery

Windows Live Essentials is a free suite of tools created by Microsoft to make everyday activities easier for the average user. In this guide we’re going to show you how to install and use Windows Live Photo Gallery, the portion of the package dedicated to editing and sharing your photo creations online. 

Share with Windows Live Photo Gallery

A quick and easy way to get your albums online. 

What you'll need...
A Windows PC & A Facebook or Flickr account A Windows Live Group

What is used...
Windows Live Photo Gallery

You could try...
Skydrive & Flickr & Picasa

What you'll Learn...
How to share your shots online
As the world’s most popular social networking site, it makes sense that you’d want to share your photo albums on Facebook. Sadly, Facebook’s own photo uploading routine is far from convenient.

Photo Gallery solves this problem by offering you the capability to combine the online sharing prowess of Facebook with the flexibility of a dedicated organising and editing application. We’ll show you how to link your Facebook account to Photo Gallery, then use it to upload a new photo album for your friends and family to enjoy. You can also share on Flickr, Windows Live Groups, and upload videos to YouTube.

if the full Windows Live Essentials pack wasn’t preinstalled on your Windows PC when you bought it, it’s very easy to download and install. You can either install the entire suite, or select which aspects of it you’d like - in this case we’re just interested in Photo Gallery, which also comes with Movie Maker, a flexible tool for creating home movies - simply make your selection and the installer will do the rest...

Download the application

You may already have Photo Gallery on your Windows 7 PC, but it doesn’t come by default, so simply navigate to http://bit.ly/ ILII8j and click the box marked Download Now. Once the installer has downloaded, simply double-click to install.

Import your images
All the images in your My Pictures folder will appear on the Home screen. If you haven’t imported any images, connect your camera and click Import. You can also use the drop-down menu and Include Folder option to add other picture folders on your computer.

Connect to Facebook
When your photo album is ready, you need to combine Photo Gallery to your Facebook account by clicking the Facebook logo in the top strap. Follow the on-screen instructions, input your account details then select the Photos and Videos option.

Choose your pictures
Once your Facebook account is tied to Photo Gallery, all you need to do is make your picture selection to upload. Choose your shots by dragging a box around a selection of images, or click the small tick boxes in the top-left corner of the pictures.

Upload to Facebook
Once you’ve made your selection, hit W the Facebook button again. You’ll be given the option of creating a new album, or adding images to an existing album. The next time you log in to Facebook, your newly created photo album will be waiting for you.

Share to Flickr
To add photos to Flickr, select the photos and click the Flickr icon. Log in with your Windows Live ID. Click Authorize then follow the instructions. Select the options from the drop-down menus on the next screen then click Publish.

Share to Groups
To share to a Windows Live Group, select the photos, click the Windows Live Group icon and the program will find groups you are a member of. Select the one you want then click Next. Choose who can view the shots, then click Publish.

7 of the best... Websites to share your photos on
Picasa
Google’s popular photo organising and editing application can either be installed as a full application, or used straight from the web.

Flickr
One of the best photo-sharing communities, Flickr is a place to connect to other amateur photographers and get feedback on your shots.

Photobucket
Like flickr, Photobucket is a great place to store and share your creations. It also has uploading apps for pretty much every smartphone.

ImageShack
ImageShack is an image-hosting service complete with the capability of syncing your shots from iPhone. It supports JPEG, PNG, GIF, TIFF, and BMP files.

PFB website
Create your very own gallery on our website by heading to photoforbeginners.com. Get feedback and be entered into our Photo Face-off!

Shutterfly
With Shutterfly you can upload your photos, as well as make a custom website. You can also make photo books, cards, stationary and more.

Digital Photographer
Head to www.dphotographer.co.uk and set up a gallery. See if - you get made Photo of the Week and get feedback from photography enthusiasts.

Do you have an interest in digital workflow photography, digital imaging infrared, photography workshops, digital stock, photo editing, macro or even forensic digital imaging and photography ?? go to photoforbeginners.com.
Source and citation: Search for PFBMag on and Share your shots at... photoforbeginners.com


For The User 

******Usman ahmed owner of this blog created this post with his knowledge.All content provided on this blog is not copied from any other blog and site and is for informational purposes only and  The owner of this blog makes no representations as to the accuracy or completeness of any information on this site or found by following any link on this site.The owner will not be liable for any errors or omissions in this information nor for the availability of this information. The owner will not be liable for any losses, injuries, or damages from the display or use of this information.