Photography with some basic Photoshop and solid shooting skills, you can create an image that reveals the full story of an action sequence - not just the climatic end or key moment but the whole thing. It's great for shooting sports like snowboarding, BMX riding or even your child attempting the long jump. One of the great things about sequence photos is how impressive they can look for how simple the technique really is. Once you learn what light is best and which kinds of locations and backgrounds work well, piecing together a masterpiece is simply a matter of following a few key steps. Like anything photography-related, a few important equipment requirements can help you pull off the shot, but if you know your camera inside out, the only limitation is your creativity.
The advantage movies have over stills is that you can use dozens of frames to convey an action or story; with stills, you have just one. Unless you use this clever technique... Pro sports photographer Tristan Cardewshows you how
The right location will go a long way; not only will it help your final image look awesome, but the right background can save you plenty of time in post-
production. The key is simplicity. Choose a background where your subject stands out; whether it's a sky or a plain, simple scene, it's important to keep your 'base image' uncomplicated. It's also important to bear in mind the safety of your subject, yourself and others. Don't shoot in crowded areas and have your subject wear a helmet if they're not feeling confident.
Once you've chosen your location, the most important factor is the light.
The quality of light is essential, but what you really want is an abundance of light so you can freeze movement with a fast shutter speed and still get a well-exposed image. A sunset may look lovely, but there won't be enough light to freeze any motion - unless you bring in flash, but that's another tutorial. Heavily backlit scenes will also be difficult to capture well in a sequence, unless you're intentionally shooting a silhouette.
GEAR
Having the camera locked off on a solid tripod allows each frame to fit together flawlessly in post-production. I use a Manfrotto 055XPROB with a Manfrotto 804RC2 three-way head.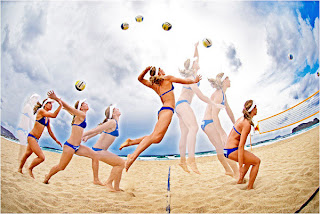
It helps to also have a camera that shoots at least four frames-per-second to capture each step of the sequence. For this tutorial,
The camera used is Canon EOS-1D Mk III set to 6fps, and then selected the specific frames I wanted to use once I’d looked at them on the computer. It's important to use fast-writing memory cards (30M B a second at least) to ensure your camera's buffer doesn’t stop you shooting the whole sequence.
SET-UP
Once you’ve chosen your location, angle and the right time of day to shoot, set up your tripod-mounted camera allowing enough space either side of the frame just in case your subject goes outside the expected area. To keep the background simple, I lowered the tripod so it was almost on the grass, filling more of the frame with the sky. Set your camera to manual exposure mode to ensure each frame is exposed the same, seta fast shutter speed (above l/500sec) and the smallest aperture the light will allow for decent depth-of-field; aim for smaller f/5.6 or I advise using a remote release, too, to avoid risking bumping the camera as you hold the shutter button down. If the frames don't line up exactly, you'll struggle to piece them together later in Photoshop.
TECHNIQUE
Two of the most common errors with this technique are shutter speeds being too slow and apertures too wide to get the area you need in focus. This is why shooting when there's plenty of light is so important; you could raise the ISO rating, but you don't want to go much higher than ISO 400 as quality will deteriorate. If you don't freeze each frame, the blurred image will result in 'ghosting' or halos. With settings sorted, you'll need to focus on the middle area your subject will pass through. If your subject isn’t in frame to focus on yet, ask someone else to stand in position or place an object there to focus on. Once the lens is focused, switch to manual focusing and set the camera to burst mode. Now take a shot of the scene with no one in the frame: this is your background image. Now all that's necessary is for you to hold down the shutter button or remote release as soon as you see your subject come in to frame, and keep it depressed until they've left the frame to capture the entire action sequence. Repeat, if possible, to give yourself the best chance of getting the best action sequence.
Finishing in Photoshop.
I. Open up all of your frames Open your background image, then select all the frames you want to use and open them together in Photoshop. Click on the first shot of your sequence and, using the Lasso Tool, loosely draw around the subject, then go to Edit>Copy.
2. Paste in your cut-out Click back on to the background image and go to Edit>Paste to add the cut-out. Use the Move Tool to position the cut-out so it lines up with the background image as best as possible. Use the arrow keys to make slight adjustments. Zooming into the image may help, too.
3.Repeat and add a Layer Mask Repeat the first and second steps with the next image from the sequence, drawing around your second step and pasting in the cut-out. This time, though, add a Layer Mask to the new image layer; click on the Add new Layer Mask button at the bottom of the Layers palette.
4. Blend in your image Click on the Layer Mask and select the Brush Tool. Using Black paint, brush over the areas of the image you don't want visible. Switch to White paint to undo any mistakes. Use an appropriate-sized brush, with the Opacity set to 100% and Hardness to 85-100% to blend in the edges.
5. Add more images Repeat steps one to four with the rest of the images, paying careful attention to the edges of your subject; you want to ensure you leave no extra background around them, especially where they overlap. The cleaner the edges of each frame, the more professional the photo will look.
6. Finishing touches Once you've laid out the entire sequence so the photo looks natural and the movement of the subject looks like it flows, flatten your image (Layer>Flatten Image). Use Adjustment Layers (Layer>Newadjustment layer) to tweak contrast and saturation, and sharpen. Bingo! You have your first sequence.
Do you have an interest in digital workflow photography, digital imaging infrared, photography workshops, digital stock, photo editing, macro or even forensic digital imaging and photography ?? go to photoforbeginners.com.
******Usman ahmed owner of this blog created this post with his knowledge.All content provided on this blog is not copied from any other blog and site and is for informational purposes only and The owner of this blog makes no representations as to the accuracy or completeness of any information on this site or found by following any link on this site.The owner will not be liable for any errors or omissions in this information nor for the availability of this information. The owner will not be liable for any losses, injuries, or damages from the display or use of this information.
The advantage movies have over stills is that you can use dozens of frames to convey an action or story; with stills, you have just one. Unless you use this clever technique... Pro sports photographer Tristan Cardewshows you how
The right location will go a long way; not only will it help your final image look awesome, but the right background can save you plenty of time in post-
production. The key is simplicity. Choose a background where your subject stands out; whether it's a sky or a plain, simple scene, it's important to keep your 'base image' uncomplicated. It's also important to bear in mind the safety of your subject, yourself and others. Don't shoot in crowded areas and have your subject wear a helmet if they're not feeling confident.
Once you've chosen your location, the most important factor is the light.
The quality of light is essential, but what you really want is an abundance of light so you can freeze movement with a fast shutter speed and still get a well-exposed image. A sunset may look lovely, but there won't be enough light to freeze any motion - unless you bring in flash, but that's another tutorial. Heavily backlit scenes will also be difficult to capture well in a sequence, unless you're intentionally shooting a silhouette.
GEAR
Having the camera locked off on a solid tripod allows each frame to fit together flawlessly in post-production. I use a Manfrotto 055XPROB with a Manfrotto 804RC2 three-way head.

It helps to also have a camera that shoots at least four frames-per-second to capture each step of the sequence. For this tutorial,
The camera used is Canon EOS-1D Mk III set to 6fps, and then selected the specific frames I wanted to use once I’d looked at them on the computer. It's important to use fast-writing memory cards (30M B a second at least) to ensure your camera's buffer doesn’t stop you shooting the whole sequence.
SET-UP
Once you’ve chosen your location, angle and the right time of day to shoot, set up your tripod-mounted camera allowing enough space either side of the frame just in case your subject goes outside the expected area. To keep the background simple, I lowered the tripod so it was almost on the grass, filling more of the frame with the sky. Set your camera to manual exposure mode to ensure each frame is exposed the same, seta fast shutter speed (above l/500sec) and the smallest aperture the light will allow for decent depth-of-field; aim for smaller f/5.6 or I advise using a remote release, too, to avoid risking bumping the camera as you hold the shutter button down. If the frames don't line up exactly, you'll struggle to piece them together later in Photoshop.
TECHNIQUE
Two of the most common errors with this technique are shutter speeds being too slow and apertures too wide to get the area you need in focus. This is why shooting when there's plenty of light is so important; you could raise the ISO rating, but you don't want to go much higher than ISO 400 as quality will deteriorate. If you don't freeze each frame, the blurred image will result in 'ghosting' or halos. With settings sorted, you'll need to focus on the middle area your subject will pass through. If your subject isn’t in frame to focus on yet, ask someone else to stand in position or place an object there to focus on. Once the lens is focused, switch to manual focusing and set the camera to burst mode. Now take a shot of the scene with no one in the frame: this is your background image. Now all that's necessary is for you to hold down the shutter button or remote release as soon as you see your subject come in to frame, and keep it depressed until they've left the frame to capture the entire action sequence. Repeat, if possible, to give yourself the best chance of getting the best action sequence.
Finishing in Photoshop.
I. Open up all of your frames Open your background image, then select all the frames you want to use and open them together in Photoshop. Click on the first shot of your sequence and, using the Lasso Tool, loosely draw around the subject, then go to Edit>Copy.
2. Paste in your cut-out Click back on to the background image and go to Edit>Paste to add the cut-out. Use the Move Tool to position the cut-out so it lines up with the background image as best as possible. Use the arrow keys to make slight adjustments. Zooming into the image may help, too.
3.Repeat and add a Layer Mask Repeat the first and second steps with the next image from the sequence, drawing around your second step and pasting in the cut-out. This time, though, add a Layer Mask to the new image layer; click on the Add new Layer Mask button at the bottom of the Layers palette.
4. Blend in your image Click on the Layer Mask and select the Brush Tool. Using Black paint, brush over the areas of the image you don't want visible. Switch to White paint to undo any mistakes. Use an appropriate-sized brush, with the Opacity set to 100% and Hardness to 85-100% to blend in the edges.
5. Add more images Repeat steps one to four with the rest of the images, paying careful attention to the edges of your subject; you want to ensure you leave no extra background around them, especially where they overlap. The cleaner the edges of each frame, the more professional the photo will look.
6. Finishing touches Once you've laid out the entire sequence so the photo looks natural and the movement of the subject looks like it flows, flatten your image (Layer>Flatten Image). Use Adjustment Layers (Layer>Newadjustment layer) to tweak contrast and saturation, and sharpen. Bingo! You have your first sequence.
Do you have an interest in digital workflow photography, digital imaging infrared, photography workshops, digital stock, photo editing, macro or even forensic digital imaging and photography ?? go to photoforbeginners.com.
For The User
******Usman ahmed owner of this blog created this post with his knowledge.All content provided on this blog is not copied from any other blog and site and is for informational purposes only and The owner of this blog makes no representations as to the accuracy or completeness of any information on this site or found by following any link on this site.The owner will not be liable for any errors or omissions in this information nor for the availability of this information. The owner will not be liable for any losses, injuries, or damages from the display or use of this information.
No comments:
Post a Comment