Use a single photo and some basic editing to create a great HDR image.
What you will need...
-Editing software
What has been used...
-Photoshop Elements
-GIMP
-Filterstorm Pro app
You could also try...
-Photoshop CS5
-Corel Paintshop Pro
-Serif Photoplus
What you’ll leam...
-How to create a quick HDR photo.
HDR, or high dynamic range, refers to an image with a greater dynamic range between the lightest and darkest areas of the shot than a normal photo. An
HDR image would therefore contain correctly exposed highlight and shadow areas, which would otherwise be difficult to achieve with regular shots. The huge tonal range that is captured with HDR technology allows the image to accurately represent the vast array of tones that are visible in everyday life.
HDR photos are usually captured as a series of shots. At least one frame focuses on capturing the brightest areas of the scene, another frame shoots the darkest areas and usually at least one other shot captures the bits in between. These images are then merged together, either in-camera or through editing software to produce the full HDR image.
HDR is an advanced technique that requires you to shoot specifically for it. However, there are a few ways in which you can replicate the look it produces, using just one regular photo, and a basic list of editing steps. Here are a few tips to try for easy HDR edits.
Photoshop Elements.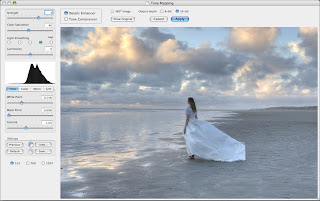
1) Open up your image and duplicate the layer by simply right-clicking on the background layer in the Layers palette. The new layer needs to have a Blending mode (the dropdown next to Opacity) set to Overlay.
2) The next step is to convert this new layer to black and white. Simply navigate to Enhance>Convert to Black and White. A new window will open up which will allow you to adjust the look of your black- and-white layer. Tweak it then click OK.
3) Next we need to invert the colours of this layer. Go to Filter>Adjustments> Invert to automatically switch the colours of the new layer. Performing this action will change the look of the shot, giving it more of a flat and even tone.
4) Adding a simple blur to the new layer is the final step in the process. Click Filter>Blur>Gaussian Blur to bring up the new window. You’ll need to experiment and tweak the settings a little bit to achieve your preferred look for the shot.
GIMP.
1) To begin making your edits, choose and open your image, then you will need to duplicate the background layer. Go to Layer>Duplicate Layer, before selecting Overlay from the dropdown next to ‘Mode’.
2) The next step to take is to remove all of the colour from this second layer. Do this via Colors>Desaturate, and choose your preferred option depending on the look you’re going for. Then once you’re happy, convert the layer to black and white.
3) In order to get the desired colour effect for the perfect HDR-style image, the colours of this new layer need to be inverted. Simply go to Colors>lnvert and they will be inverted automatically, which instantly gives the image a whole new look.
4) The final step in performing your HDR cheat is to add a blur to this new layer. This will finalise the look of the dramatic effect. Go to Filters>Blur>Gaussian Blur. You can then adjust the different values until you’ve found the look you want.
Filterstorm Pro.
1) Once the application is open, you will be presented with a range of different albums and locations for your photos. Tapping on the Camera Roll will bring up all of the images within your iPad gallery.
2) Once you have opened your chosen image you will be presented with a toolbar on the left-hand side of the interface. Look for the Filters menu and tap on the tab which will then take you to the variety of different filters available.
3) From the filters menu, simply select the Tone Mapping option. This refers to the complex process of adjusting the various tones used in more-advanced HDR editing programs, and is perfect for creating a fake HDR image.
4) Once the Tone Mapping screen is open, you can use the two sliders on the right-hand side to adjust the look of the image. You can also use these handy sliders to experiment with blending modes to find a style you like.
3 of the best.. Apps for creating an HDR Effect.
Pro HDR Camera - iOS £1.49/$1.99, Android £1.24 (approx $1.99)
This simple app allows you to use your device to get HDR-looking shots straight out of the camera.
HDR Camera - Free
Use this free app with your Android smartphone to create a simple HDR image in just one tap.
True HDR - £1.49/$1.99
Use your iPhone or iPad to create an HDR shot and use manual modes and custom sliders to get the exact look you want.
******Usman ahmed owner of this blog created this post with his knowledge.All content provided on this blog is not copied from any other blog and site and is for informational purposes only and The owner of this blog makes no representations as to the accuracy or completeness of any information on this site or found by following any link on this site.The owner will not be liable for any errors or omissions in this information nor for the availability of this information. The owner will not be liable for any losses, injuries, or damages from the display or use of this information.
What you will need...
-Editing software
What has been used...
-Photoshop Elements
-GIMP
-Filterstorm Pro app
You could also try...
-Photoshop CS5
-Corel Paintshop Pro
-Serif Photoplus
What you’ll leam...
-How to create a quick HDR photo.
HDR, or high dynamic range, refers to an image with a greater dynamic range between the lightest and darkest areas of the shot than a normal photo. An
HDR image would therefore contain correctly exposed highlight and shadow areas, which would otherwise be difficult to achieve with regular shots. The huge tonal range that is captured with HDR technology allows the image to accurately represent the vast array of tones that are visible in everyday life.
HDR photos are usually captured as a series of shots. At least one frame focuses on capturing the brightest areas of the scene, another frame shoots the darkest areas and usually at least one other shot captures the bits in between. These images are then merged together, either in-camera or through editing software to produce the full HDR image.
HDR is an advanced technique that requires you to shoot specifically for it. However, there are a few ways in which you can replicate the look it produces, using just one regular photo, and a basic list of editing steps. Here are a few tips to try for easy HDR edits.
Photoshop Elements.

1) Open up your image and duplicate the layer by simply right-clicking on the background layer in the Layers palette. The new layer needs to have a Blending mode (the dropdown next to Opacity) set to Overlay.
2) The next step is to convert this new layer to black and white. Simply navigate to Enhance>Convert to Black and White. A new window will open up which will allow you to adjust the look of your black- and-white layer. Tweak it then click OK.
3) Next we need to invert the colours of this layer. Go to Filter>Adjustments> Invert to automatically switch the colours of the new layer. Performing this action will change the look of the shot, giving it more of a flat and even tone.
4) Adding a simple blur to the new layer is the final step in the process. Click Filter>Blur>Gaussian Blur to bring up the new window. You’ll need to experiment and tweak the settings a little bit to achieve your preferred look for the shot.
GIMP.
1) To begin making your edits, choose and open your image, then you will need to duplicate the background layer. Go to Layer>Duplicate Layer, before selecting Overlay from the dropdown next to ‘Mode’.
2) The next step to take is to remove all of the colour from this second layer. Do this via Colors>Desaturate, and choose your preferred option depending on the look you’re going for. Then once you’re happy, convert the layer to black and white.
3) In order to get the desired colour effect for the perfect HDR-style image, the colours of this new layer need to be inverted. Simply go to Colors>lnvert and they will be inverted automatically, which instantly gives the image a whole new look.
4) The final step in performing your HDR cheat is to add a blur to this new layer. This will finalise the look of the dramatic effect. Go to Filters>Blur>Gaussian Blur. You can then adjust the different values until you’ve found the look you want.
Filterstorm Pro.
1) Once the application is open, you will be presented with a range of different albums and locations for your photos. Tapping on the Camera Roll will bring up all of the images within your iPad gallery.
2) Once you have opened your chosen image you will be presented with a toolbar on the left-hand side of the interface. Look for the Filters menu and tap on the tab which will then take you to the variety of different filters available.
3) From the filters menu, simply select the Tone Mapping option. This refers to the complex process of adjusting the various tones used in more-advanced HDR editing programs, and is perfect for creating a fake HDR image.
4) Once the Tone Mapping screen is open, you can use the two sliders on the right-hand side to adjust the look of the image. You can also use these handy sliders to experiment with blending modes to find a style you like.
3 of the best.. Apps for creating an HDR Effect.
Pro HDR Camera - iOS £1.49/$1.99, Android £1.24 (approx $1.99)
This simple app allows you to use your device to get HDR-looking shots straight out of the camera.
HDR Camera - Free
Use this free app with your Android smartphone to create a simple HDR image in just one tap.
True HDR - £1.49/$1.99
Use your iPhone or iPad to create an HDR shot and use manual modes and custom sliders to get the exact look you want.
For The User
******Usman ahmed owner of this blog created this post with his knowledge.All content provided on this blog is not copied from any other blog and site and is for informational purposes only and The owner of this blog makes no representations as to the accuracy or completeness of any information on this site or found by following any link on this site.The owner will not be liable for any errors or omissions in this information nor for the availability of this information. The owner will not be liable for any losses, injuries, or damages from the display or use of this information.
No comments:
Post a Comment