Monday, April 1, 2013

Guide To Shoot At Beach

Take perfect beach photos or coastal landscape photos to the seaside and capture some stunning marine by making the most of the Light.

Taking photos at the beach is usually associated with family days out and portraits. However, with the open sea ahead of you, it’s a great location to capture some fantastic photos.
Heading out on a bright and sunny day will give you vibrant colours in both the sea and sky, allowing you to capture a simple yet beautiful picture without the need for a main focal point.

Seascapes are also one of the best places for photographing the sunrise and sunset. The clean horizon makes them ideal for these types of shots, putting all of the focus on the colourful sky. There is also the reflection of the water which adds to the whole effect.


Seascapes are one of the best places for photographing the sunrise and sunset

Scene mode


Many digital cameras
come with a range of automatic scene modes. Sunset mode is popular. Using this mode allows your camera to choose the right settings for a correct exposure, while also boosting the vibrant colours.

Take the shot
With sunsets, every
passing minute offers a new look. It’s a good idea to keep on shooting until the sun has gone down completely, ensuring you capture the best-possible sunset. You can then take your pick from a set of great shots.

Waterproof cover
A waterproof cover isn’t just useful for when you’re caught in a downpour. They can also be used at the beach to protect your camera from splashes of water.

Changing lenses
When changing lenses
be sure to do it quickly and out of the wind. Sand and other particles can be blown inside the camera and can cause a great deal of damage.


For The User 

******Usman ahmed owner of this blog created this post with his knowledge.All content provided on this blog is not copied from any other blog and site and is for informational purposes only and  The owner of this blog makes no representations as to the accuracy or completeness of any information on this site or found by following any link on this site.The owner will not be liable for any errors or omissions in this information nor for the availability of this information. The owner will not be liable for any losses, injuries, or damages from the display or use of this information.

Guide for Shooting Landscapes

Learn how to photograph any type of Landscape with this simple guide.
Landscapes and photos of landscapes are popular because they are accessible to everyone. As subjects they are all around us, often overlooked as we do other things, making them ideal to shoot when out and about.

Landscapes do not require any specific equipment or even expertise. Other genres, such as macro photography, require much more expensive and complex photo gear and methods, and take a lot of practice. But landscapes can be captured on any camera, from a smartphone to a DSLR, they don’t require any special knowledge and great shots can be captured in seconds.
When thinking of landscapes, many people picture scenic rolling hills out in the countryside. However, this genre can include a range of subjects, from simple beach shots to town and cityscapes.

Although quick to shoot and accessible to everyone, to capture some really 
exceptional views there are a few elements to consider. These include your camera settings, how you piece your shot together and even the lighting of the scene.

Composition

Get great shots every time using these simple rules:
Master these easy compositionaL tricks to get the most out of any Landscape you shoot

Composition generally dictates what your resulting image will look like. It
refers to elements such as how you frame the scene you are photographing and where you place certain elements in the shot to get the most visually interesting photo possible.

Do and Don'ts

Grid Lines
Most digital cameras now come with grids that can be overlaid onto the LCD screen, allowing you to apply the rule of thirds while taking your shot.

Tripod
Using a tripod will not only allow you to keep your camera still, but it also helps you to get a straight image and perfect your photo’s composition.

Lens hood
Using a lens hood when out shooting will help to protect the delicate glass of your lens, as well as reduce the risk of any glare entering your shot.

Image aspect
Many cameras are able to shoot in a 16:9 image aspect, which gives images a wide-angle look, great for capturing sweeping photos of the countryside.

High ISO
With landscapes you want to capture the details of your scene. Use a low ISO to avoid unwanted grain and to keep the color of your shots saturated.

Vibration reduction
Turn off vibration reduction if you’re using a tripod. It will try to make up for movement that isn’t there, making your shot blurry.


For The User 

******Usman ahmed owner of this blog created this post with his knowledge.All content provided on this blog is not copied from any other blog and site and is for informational purposes only and  The owner of this blog makes no representations as to the accuracy or completeness of any information on this site or found by following any link on this site.The owner will not be liable for any errors or omissions in this information nor for the availability of this information. The owner will not be liable for any losses, injuries, or damages from the display or use of this information.

Photo Shoot Your Holiday

Photograph your holiday: From family portraits to local landmarks, here's how to take and shoot brilliant holiday snaps / pictures. Holidays are a tricky subject to consider when it comes to photography. This is due to the huge range of opportunities and subjects available to capture in order to preserve your memories.

The first thing to consider with this type of photography is the kit you are going to have with you. Travelling means carrying a smaller amount of kit, and so only taking the necessary items can not only help with baggage allowance, but can also leave more time to concentrate on getting great shots rather than choosing the right equipment.
The typical week in the sun might contain beaches and bright sunny scenes, but it can just as easily include things such as hiking trips and extreme sports. Depending on your hobbies, this vast range of subjects means that you have to be prepared to capture anything. To do this, you’ll need to know 
the ins and outs of your camera. From vast open scenes, to family portraits and even creative shooting, being ready to capture everything that tells the story of your trip can ensure your holiday photo album is one to treasure for many years to come.

People.
Take memorable captures of your family and friends.
Make the most of your time amay and shoot your best-ever portraits in any Location at home or abroad Capturing your friends and family is a big part of any holiday. You
want to be able to preserve memories and get shots of everyone having a good time, so being prepared to capture them will ensure you get plenty of excellent photos to remember your time together.
Portraits of your loved ones are perhaps some of the most important shots you’ll capture, as well as making up the vast majority of many holiday albums. As well as the more common posed shots, it’s important to consider that a lot of your best photos will be candid moments that require you to be quick to grab the shot, as well as those times when you’ll want to be in the frame too.
Portraits can be shot at any location, with different backgrounds, activities and settings, so ensuring you have mastered the settings you need will help you to capture some great summer memories.


Shutter speed
lf your camera has shutter priority mode, use this to set a fast shutter speed (around 1/250) to freeze action. You select the speed and the camera chooses the other settings.

Continuous AF
By changing from a Single Point Autofocus to Continuous or Tracking Autofocus, you’ll be able to follow any moving subject and keep them in focus, ready to take the shot.

Burst mode
By using a high-speed continuous shooting mode or a Burst mode, you can easily fire off a number of photos in quick succession to ensure you get the perfect shot.

ISO
To ensure you can shoot fast enough, boosting your ISO will make your camera’s sensor more sensitive and will help to keep the shooting speed high enough to capture the action. 


Places.

Take better photos of local landmarks and scenery
Landmarks are a common shot to take when you’ve visiting a new place, and are an easy subject to capture with some simple tips. Try
visiting the more popular locations at quieter times of the day. Not only will this give you more room to capture the shot, but it will ensure the scene isn’t cluttered with other people taking the exact same photo.
The local scenery can be another great subject to shoot effectively, and one that can be captured in any way you like. From wide open vistas to the little details of everyday life in the local towns and cities.
You could also try including people to give a sense of scale to your subjects, shoot from a range of different angles and visit the same locations at night to give your images a completely new look.

Underwater Pictures
Get creative underwater for impressive portraits
Underwater shooting is now simpler than ever with the development of tough waterproof compact cameras. Getting great shots of wildlife or friends and family in the depths is as easy as any other shot, and can add a touch of creativity to your memories.
Simply switching over to your underwater scene mode makes you ready to snap away. Try capturing underwater portraits of the kids or even break out the video functions for those action moments.
For those without one of the new tough cameras, there are lots of waterproof cases available to help you turn any compact into an underwater camera 

Share:
Compile your entire album of memories to create a photo book using Jessops' easy design tool.
Once the holiday is over and you’re digging through the hundreds of shots, the question of what to do with them all will inevitably crop up. Putting them together in a simple photo book ensures the album is kept together and can even allow you to design the different sections, together with annotations to tell the story of your holiday.

Jessops range of photo books
M Photo books are one of Jessops’ more advanced photo products.
You can choose to design the book yourself or you can hand your photos over to a designer who will do it for you.

Download photo book designer
Downloading the photo WMbook designer will give you a standalone program with which to create your book. You’ll then be able to choose the size of your book and begin adding your photos.

Add your photos
Using the windows to Ww the left-hand side of the interface, simply browse your computer until you find your holiday album. From there you can drag and drop the shots you want to use onto the main screen.

Edit your design
Clicking on any image will allow you to adjust its size and position. You can also drag and drop images to arrange it how you please. Once you're happy, follow the order process to get your book printed and delivered.


For The User 

******Usman ahmed owner of this blog created this post with his knowledge.All content provided on this blog is not copied from any other blog and site and is for informational purposes only and  The owner of this blog makes no representations as to the accuracy or completeness of any information on this site or found by following any link on this site.The owner will not be liable for any errors or omissions in this information nor for the availability of this information. The owner will not be liable for any losses, injuries, or damages from the display or use of this information.

Get Creative With A Vertical Panorama

Shoot Panoramas: How panoramas aren't just for Landscapes. Panoramas are extremely wide-angle images, generally consisting of a number of shots compiled together to complete the single wide-angle photo. Panoramas are therefore ideal for landscape scenes that are too vast to get into a single shot. However, they can also be used to simply elongate the perspective of the scene according to PFBmag.

Often it’s not only landscapes that are difficult to fit into a single frame. Even with the some of the widest cameras and lenses, it’s still tricky to squeeze everything you want to capture into one single shot.


Commonly, interior images require very-wide angles of view, due to having restricted space in which to stand and having few choices of composition.
Utilising a panorama technique is therefore one of the best ways to include an entire interior scene within one single photograph.


Although panoramas are usually kept horizontal, switching the orientation to vertical allows you to take the simple technique to new locations and capture some truly unique shots. Striking and ornate interiors such as those that can be found in churches and cathedrals will usually have interest at both eye level all the way through to the ceiling above. This type of beautiful interior architecture makes them the perfect subjects for experimenting with shooting vertical panoramas.


Half of the scene.

Even with a wide-angle lens, a single photo will only show a small part of the scene, which just doesn’t have the visual impact of a vertical panorama.

Shoot vertically for a unique perspective.


Use your scene modes.

Many cameras now come with a panorama mode. This guides you through taking a succession of images for a finished panorama. If you don’t have this mode, you can take a succession of shots and stitch them together in editing software.

Choose your settings.

If your camera doesn’t have a built-in panorama mode, it’s best to try and take control of the settings. Switch to aperture priority and select an aperture of around fll. This will give a large-enough depth of field to have most of the interior in focus.

Single point autofocus.

Adjusting your AF setting is important, as you want the focus to be the same for each shot. Switching to a single point AF will stop the camera from focusing while you recompose, as well as allowing you to choose the best part of the scene to focus on. 

Shoot wide.

Although not always necessary, selecting a wide focal length allows you to get the most of the scene in the shot as possible. Stitching shots together for a panorama also lets you overlap images, so don’t be afraid to include more than you need.

Set up a tripod.

A tripod is a key accessory for capturing panoramas. Not only does it help to keep the camera still in less-than-perfect lighting conditions, it ensures you keep the camera in the same position and allows you to smoothly move between each shot.

Take your shots.

Start at the top or bottom of your scene and focus in the centre of the frame. Take your first shot, then tilt the camera slightly to shoot the next. Repeat these steps to capture the entire view. Turn the page to see how to stitch them together.


For The User 

******Usman ahmed owner of this blog created this post with his knowledge.All content provided on this blog is not copied from any other blog and site and is for informational purposes only and  The owner of this blog makes no representations as to the accuracy or completeness of any information on this site or found by following any link on this site.The owner will not be liable for any errors or omissions in this information nor for the availability of this information. The owner will not be liable for any losses, injuries, or damages from the display or use of this information.

Shooting Photos Common Mistakes

Using the wrong shooting modes for The scene. Take advantage of settings for the best possible photo

Modern digital cameras are so sophisticated that it’s all too easy to leave your camera to do all of the work. For the vast majority of subjects this approach does yield some excellent results. However, within the complex nature of digital cameras there are even more ideal shooting modes on offer. Switching your camera over to a manual or semi-manual mode, for example, can allow you to get the most out of any photo situation as well as get creative with your shots. On the other hand, simply switching over to a dedicated scene mode can be all you need to do to get the most out of your camera in specific circumstances. 


1. Staying in auto
Although modern digital cameras have the ability to recognise specific scenes with auto 
modes, sometimes they can pick the wrong settings for your subject. Try moving into manual 
modes to take more control.

2. Ignoring ISO

Many are guilty of leaving the ISO setting well alone. However, monitoring it can ensure you don’t get grainy images, and it can also be used to help you get those important shots in difficult lighting conditions.

3. Incorrect scene mode

Scene modes are now more usable than ever, but make sure you remember to change the scene mode over when you start shooting a different subject, such as moving from a landscape to a portrait.

4. Wrong white balance

Set a specific white balance, such as Tungsten for indoors, then forgetting to change it when you move outside, which can produce a colour cast. Either use auto or remember to change it!


Out of focus photographs


Make the most of the focus for instantly sharper shots

Focusing is one of the easiest things to get wrong in photography. Digital cameras now come with numerous focusing modes, and with so many to choose from it’s easy to pick the wrong one and end up with a blurry shot. However, identifying the best settings for each scene and taking full control can ensure that all of your shots come out of the camera with pin-sharp details. 


1. Missing focus

With moving subjects, it’s W easy to miss the focus using the wrong mode. Use Focus Tracking to maintain focus on a fast subject like animals or kids.

2. Only using single AF

Staying in single-point autofocus may mean it won’t recognise the subject in a busy scene. Select your focus point using a multi-point AF setting.

--> 
 
3. Avoiding manual

When the camera is struggling to focus, such as when wire fences are in the way, don’t be afraid to switch to manual to get accurate results.

4. Not focusing on eyes

In portrait and animal shots, it’s important to focus on the eyes for a stronger shot. Use your LCD to zoom in and check your focus is correct.


For The User 

******Usman ahmed owner of this blog created this post with his knowledge.All content provided on this blog is not copied from any other blog and site and is for informational purposes only and  The owner of this blog makes no representations as to the accuracy or completeness of any information on this site or found by following any link on this site.The owner will not be liable for any errors or omissions in this information nor for the availability of this information. The owner will not be liable for any losses, injuries, or damages from the display or use of this information.

Control Exposure

Exposure systems in today’s digital cameras are amazing. It was not all that long ago in the history of photography that cameras did not even have meters, let alone complete metering systems with the power of minicomputer. A camera’s metering system examines the light coming through the lens as it is reflected by the subject, compares that light with the surrounding light, and calculates an exposure that will give you good results. Even the cheapest of digital cameras offer metering that makes exposures far more reliable than in years past.

But great exposure that really expresses your interpretation of a subject is not so simple. Plus, poor exposure can quickly take your photos from good to unacceptable. Metering systems can misread the amount of light and give you a photo unlike what you have in mind. To improve your chances of getting the exposure you want, it helps to understand how to make the most of your digital camera’s exposure system and its features. In fact, a really great aid to better exposure is the camera’s LCD, its exposure warnings, and the histogram. If you are not happy with the picture that you took, you can shoot until you get what you want — and it does not cost a thing!


UNDERSTANDING EXPOSURE to get the photos you want

The right exposure is whatever makes your subject look its best in the type of photograph you create.
 That means exposure is definitely subjective. However, most people know when an exposure is right or wrong. Overexposed photographs are overly light, and detail is lost in the highlights. Underexposed photos are overly dark, and detail is lost in the shadows. The key thing about exposure is that important detail, dark or light, is captured properly so that the scene is light or dark appropriate to the subject.


Unfortunately, the world typically offers up a range of tones greater than what is possible to capture with a sensor. First, you might not be able to hold detail throughout the image with your exposure. Most digital photos look their worst with any overexposure or very dark underexposure. Good exposure results from the appropriate combination of shutter speed, aperture, and ISO speed. Exposure can be determined solely by the camera, interpreted by you (as the photographer) and the camera together, or solely by you.


Underexposed
Too little exposure for this scene resulted in
a muddy-looking image hiding
detail in the shadows.


Properly Exposed
This well-exposed photograph
holds color in the sky and reveals
details in the shadow areas.


Overexposed
Overexposing this photograph
lost color in the sky and made the
overall image look “washed out.”


Incorrect Metering I
The dark trees and
shadows of this scene
over-influenced the
metering system,
causing overexposure
so that the bright light
washed out the white
church.


Incorrect Metering II
The bright sky in this image of a
London monument caused the meter
to read the exposure incorrectly,
resulting in underexposure that made
duller colors and whites that look
dingy gray.


Did You Know?
One advantage of using the RAW format is that RAW captures more tonal steps between pure black and pure white as seen by the sensor. The result is an image that allows more correction to exposure in RAW conversion software. Still, RAW is no magic bullet that fixes bad exposure. You still need to be sure you have not made an image too light or too dark because once bright areas become pure white, or black becomes pure black, no amount of adjustment retrieves detail in those areas.


Photo Tip!
If you are shooting in tricky light or you are shooting a scene that seems to be difficult to meter correctly, consider using the auto exposure bracketing feature if it is available on your camera. Auto exposure bracketing enables you to shoot three or more sequential shots, each with a different exposure. The camera automatically shoots at user-selected + and – exposure changes around the metered setting.


Know WHAT METERS REALLY DO


Exposure meters can measure only how much light comes from a scene. The meter cannot know if that scene is a light scene in dark conditions or a dark scene in bright light. So, the meter really gives an exposure that results in an average or middle-gray tonality for everything, which is not appropriate for every subject.


Camera metering systems have multiple metering points over the image area to give the camera’s built in metering computer something more to work with than a single (and perhaps misleading) meter reading. Still, certain types of scenes present problems.


An image made up of dark tones over the whole composition will usually be overexposed because the meter wants to make it bright, not “knowing” that the scene is not bright. A photo that has mostly bright tones will typically be underexposed because the meter wants to darken it, not “understanding” that the scene is not darker.


Finally, a scene with a strong contrast between the subject and background often causes the meter to improperly expose the subject. A bright background causes a dark subject to become underexposed, and a dark background can make the subject overexposed.


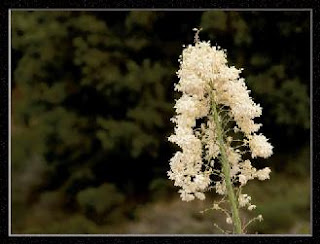
The dark foliage in the
background that makes up much
of this scene of a chaparral yucca
flower can easily over-influence
the meter, causing an exposure
that is too much for the smaller
area of white flowers.


The meter does not know
the difference between dark
conditions and a dark subject,
so it overexposes dark scenes
like the waterfall here,
making the falls too bright.


Meters often
underexpose a dark
subject in front of a
bright background,
such as this moth and
plant. The right
exposure shown here
keeps dark details
looking good by using
some compensation by
the metering system.


The light on this small pear has a
beautiful open quality to it, but
many meters expose such a white
scene too dark, making the
image dark and muddy looking.


Photo Tip!
RAW files can be helpful in difficult metering conditions. With RAW software, you can often bring out detail in the shadows while holding tonalities in the highlights, even when the light is contrasting and hard to meter. That does not mean you can be sloppy with RAW exposures, though. You need to do the best you can for every subject in order to get the best possible detail and color from a scene.


Did You Know?
One thing you pay for with more expensive cameras is more metering points in the scene for the metering system to evaluate. With more points, the system can better find the key tones to favor, while ignoring single-point anomalies of light, such as a bright spot in an overall moderate-toned image.


Know When There Is NO PHOTO


“The camera is not the same as a person” may seem like an obvious statement, yet a common mistake many beginning photographers make is that they want the camera to act like they do in terms of seeing the world. The camera is restricted by technological limitations that your eyes and brain do not have.

This is especially important with exposure. Photographers see a subject and take the picture with the expectation that the “right” exposure will give a good picture. When the photo does not cooperate and results are poor, they think that they just did not adjust the camera right. In fact, the scene might be beyond the capabilities of the camera, even though you can see it perfectly.


This is most common in extreme lighting conditions. Your eyes can handle a huge range of detail from dark to bright in situations such as a scene where the light goes from brightest sun to dark, dark shade. The camera simply cannot handle such conditions and no exposure will be “right.” Sometimes it is important to recognize when a good photograph is not possible and then move on to something that is.


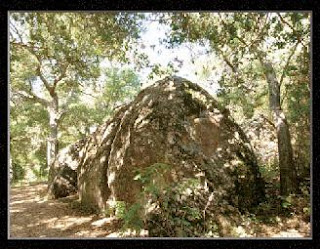
Unfortunately, there is no good
exposure for a scene like this rock
formation in the woods. The light
is too spotty and too contrasty
for the camera sensor to capture
what you might see there.


Extreme conditions of backlit
clouds and shaded bushes are
beyond the capabilities of a
camera sensor even though
you might see detail throughout
the scene.


The light chops up this
scene into bright and
dark areas that no
camera can handle
properly.


Did You Know?
The human eye is capable of seeing quite a range of tones in the real world from 10,000:1 to 1,000,000:1 depending on conditions and how the eye adapts to those conditions. The digital camera, on the other hand, has a range of approximately 1024:1. This is why you can see things in light that causes problems for a camera.


Just Say No!
Photographers often are so strongly attracted to a subject that they want to take its picture regardless if a good photo is possible or not. One thing that can help you become a better photographer is remembering that you always have a decision to not take a picture, to just say no to bad light and poor exposure.


Discover different EXPOSURE MODES


Most digital cameras offer a variety of automatic exposure modes, including program, shutter priority, and aperture priority, as well as manual mode. Choosing an exposure mode determines what exposure settings you can select and what exposure settings the camera automatically selects based on other choices you have made.


In P or program mode, the camera automatically chooses both shutter speed and aperture settings. When you select the S or shutter priority mode (also called Tv for time value), you choose a shutter speed, and then the camera automatically chooses the aperture setting to get a good exposure. Select a shutter speed appropriate to the subject — a fast speed such as 1/500 second for action or a slow shutter speed such as 1/2 second for a blur effect. In the A or aperture priority mode (also called Av for aperture value), you choose the aperture setting that you want, and the camera selects the appropriate shutter speed. Choose a small aperture such as f/16 for deep sharpness or depth of field, and a large aperture such as f/4 for shallow or selective focus effects. When you want complete control over both shutter speed and aperture, choose the manual mode.


For snapshot photos and general


use, select the program
automatic exposure mode.


Choose aperture

priority mode when
you want to control
depth of field; in this
mode, you select the
aperture and the
camera automatically
sets the shutter
speed.


Choose shutter priority mode
when you want to control
shutter speed; the camera then
automatically sets the aperture.


Did You Know?
Program-shooting modes (also called scene modes) such as Landscape, Macro, and Portrait offered by many digital cameras automate the process and often result in a good photograph. However, they are not likely to produce photos as good as you can get if you understand and correctly use the shutter priority or aperture priority mode settings.


Caution!
Many program-shooting modes allow the camera to automatically change the ISO setting if the metering system thinks a change is needed. Sports mode, for example, shifts to a higher ISO if it needs a faster shutter speed. When the camera selects a higher ISO speed, there is potential for more digital noise in the image. If you do not want to have excess digital noise, make sure that you know when to avoid using a mode that causes automatic ISO speed changes.


Choose an appropriate PROGRAM MODE


Although built-in exposure meters are extremely sophisticated, they can give readings that do not provide the exposures you want. To give you more control over what light is metered, most digital cameras offer more than one exposure meter mode.

Some of the more common exposure meter modes are multisegment (called such things as ESP, Evaluative, and Matrix metering), center-weighted, and spot. The most useful is the multisegment mode, which takes multiple readings across the scene, and then smartly compares them inside the camera in order to get a better exposure (it does not average readings). Multisegment, however, is often available only for autoexposure modes.

The center-weighted mode places most of the meter emphasis on the center and bottom of the image and is a good all-around mode for manual exposure. Spot metering reads only a tiny part of the image so that you can very precisely meter the most important light in a scene or a subject that is different than its background.


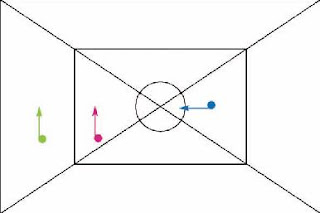
Green: This area is read by the
multisegment metering mode.
Pink:  This area is read by the
center-weighted metering mode.
Blue: This area is read by the spot
metering mode.


The multisegment metering
mode is well suited for most
images like this scene.


Bright light along the
edges is less likely to
fool the centerweighted
metering
mode, where priority is
given to the center and
bottom of the image.


This scene was correctly metered
using the spot metering mode to
meter parts of the store in order
to figure out the right exposure.


Did You Know?
Many digital cameras have selectable autofocus points that enable you to focus on off-center subjects. Many cameras also link metering modes to these selectable autofocus points, such as favoring the focus point in multisegment metering, or linking the spot meter to a point. This feature makes it easy to focus on an offcenter subject and to meter the light from that same point.


Photo Tip!
When your chosen exposure metering mode does not result in the exposure that you want, you have two choices. You can adjust the exposure either by using exposure compensation or by using the manual mode, in which you choose both the aperture and shutter speed settings without any assistance from the built-in meter.


USE THE HISTOGRAM to get the exposure you want


Many digital cameras include a special graph called a histogram that shows the brightness levels of an image ranging from pure black on the left to pure white on the right. It can give you excellent information that helps you better adjust your exposure.

There is no such thing as a perfect shape to a histogram. It can reflect only the real-world brightness levels of your scene. Although the left side can be important, the key to reading a histogram is to watch the right side. If the histogram slams up against the right side so that its slope is abruptly chopped off, it is said to be clipped, and this represents an image with lost or blown-out highlight detail.


A gap on the right side of the histogram is a problem, too. It means your photo is underexposed and you are not fully using your sensor. In general, adjust your exposure so that highlight detail is retained without clipping and the histogram is not crammed to the right side or showing a big gap there.


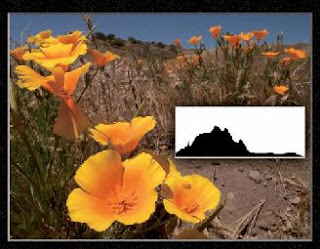
The photo here of
poppies is properly exposed, as
seen in the histogram with a
complete graph of brightness
levels from left to right.


This snow plant in Yosemite was exposed
incorrectly as seen by the big gap
at the right in the histogram. The
whole image is dark and muddylooking
from underexposure.


 The blackberry plant

and flowers in this
photo are seriously
overexposed and
washed out. You can
see the right side of the
histogram is clipped off,
meaning the bright
areas are pure white
instead of detailed
highlights.


The range of tones for this finish at-
distance event at a track meet
is perfect for the scene. Slight
clipping such as seen in the
histogram is normal when small
highlights, like the edge-lit white
fabric, are very bright.


Caution!
Many digital cameras enable you to change the brightness of the LCD screen used to view images that you are about to take or have taken. Changing the brightness level or viewing the screen in bright light can cause you to misread the exposure. If your camera offers a histogram, you can use it to give you an accurate view of the exposure, regardless of the LCD screen brightness setting or bright light.


Did You Know?
Digital photo editors, such as Photoshop Elements, have a feature similar to the histogram on some digital cameras for reading the overall brightness of an image. The Levels command provides a histogram along with the ability to modify the tonal range and overall image contrast.


Improve exposure with EXPOSURE COMPENSATION


Sometimes the built-in light meter in your camera can misinterpret a scene and give you a poor exposure. A good way of correcting this to get a good exposure is to use exposure compensation. Most cameras offer this feature, which often appears as a +/– button or menu choice.

Exposure compensation enables you to modify the exposure up or down from the metered reading by a specified amount. By doing this, you can continue shooting using the modified meter reading settings and get good exposures. For example, a +1 exposure compensation increases the exposure by one f-stop or the shutter speed equivalent, and –1 reduces it the same; a +1/2 setting increases the exposure a half step, and –1/2 reduces it by the same amount.

Exposure compensation can be particularly useful if your scene is overall very bright, such as on a beach or in the snow, or very dark, such as when a lot of shadow fills the image area. In those cases, the meter misinterprets the exposure. Make an exposure compensation adjustment and see if your histogram has improved.


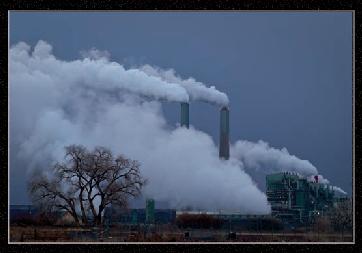
Metered Setting
This photo was shot using the
metered settings. The meter
was over-influenced by the
white steam clouds from the
power plant.


This photo was shot with a +1
exposure compensation setting
to make the image look more
natural and bring out more
details of the steam clouds as
well as the rest of the scene.


Metered Setting

This photo was shot
using the metered
setting. The meter was
misled by the dark trees
through much of this
scene in the Olympic
National Park.


A –1 compensation corrected
the overexposure for the snowcovered
mountains.


Try This!
Many cameras include a feature called auto exposure bracketing. With this control, you set up your camera to take a series of photos (most often three, though some cameras do more) where one is at the exposure chosen by the meter, one is at less exposure, and one is at more exposure. You choose how much of a change there is between exposures. Most of the time, you will find that a half to full stop or step change between exposures works well.


Photo Tip!
There may be times when you want to shoot with more than the exposure compensation available on your camera. In those cases, check to see what exposure the camera is setting, then choose the manual shooting mode with an exposure more or less than the camera meter system recommends. Check your histogram to confirm the exposure.


Avoid blown-out HIGHLIGHTS


If any photography rule should not be broken, it is that you should avoid blown-out highlights, except when they are unimportant to the subject or you want them for creative reasons. A blown-out highlight occurs when you use exposure settings that make part of the image pure white where there should be details.

The problem with pure white is that you cannot bring detail into a photograph where no detail exists in the image file. An annoying bright area that has no detail cannot be fixed by using the computer. No magic bullets exist for this condition in image-processing software such as Photoshop Elements. If your camera LCD has a histogram, it probably also has a highlight alert, which is a feature that shows blinking patches on bright white areas in the photo.

These blinking patches mean that you need to decrease the exposure until no more blown-out highlights exist. Watch your histogram, though, because you do not want a gap at the right, either. A histogram clipped at the extreme right also indicates that you need to reduce your exposure.


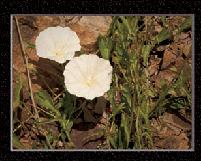
The right exposure holds the
detail in these white bindweed
blossoms of the
chaparral.


The wrong exposure blows out
the detail in the same blossoms.


On many cameras, blown-out
highlights appear as “blinking
highlights.”


The pure white
highlights from the
flare around the sun
are normal and should
not be exposed for
detail. This is a wellexposed
photo of a
saguaro cactus.


The white of the clouds is very
important to this aerial scene
shot.
Overexposure would hurt the
texture and form of the clouds.


Did You Know?
When shooting with a digital camera, most of the time you should choose exposure settings to properly expose for the highlight area of a scene. Using image-processing software such as Photoshop Elements, you can often bring details back into an underexposed area; you cannot, however, bring detail back from an overexposed highlight area where all the details are blown out, because there are few or no details in the near-white or pure-white areas.


Did You Know? 
One place that pure white is acceptable is in spectral highlights. A spectral highlight is a bright spot from a shiny, highly reflective surface. Generally, spectral highlights are small and limited in size.


Shoot multiple exposures to get MORE EXPOSURE RANGE


Photography and print professionals refer to the range between the darkest parts of an image and the lightest parts of an image as the tonal or dynamic range of a photo. A composition that has very bright parts, such as a bright white sky, and very dark parts where there are deep shadows, is said to have a wide tonal range and can be difficult to capture with a digital camera. The contrast of such a tonal range is often beyond the capability of the sensor.

One way to capture details in the shadow areas and in the highlight areas is to use a special digital technique. By putting your camera on a tripod, you can shoot the identical scene several times but with different exposures in order to capture a range of exposures that covers the dynamic range of the scene. The resulting images can be merged together using a special feature in Photoshop Elements. Or sometimes you can shoot once using the capabilities of the RAW format and convert the image twice — once for shadow detail and once for highlight detail. You then merge the two together.


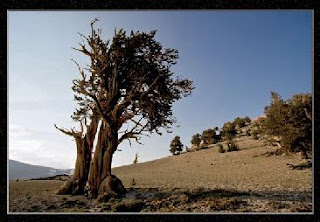
You could easily see bright clouds

in the sky as well as great detail
and color in the bristlecone pine’s
wood while standing at this
scene, but the camera could not.
This is a normal sort of exposure,
about the best the camera
can do.


This bright photo was exposed
to get a good rendering of the
wood on the bristlecone pine.


In this shot, exposure
was based on getting
good results from the
sky and revealing the
clouds at the lower left.


The final shot shows the
combination of the good parts
of the three exposures so that a
more accurate rendering of the
scene can be shown, rather than
the incorrect interpretation that
was limited by the sensor’s
capabilities.


Did You Know?
Many photographers use a graduated neutral density filter to enable them to capture a wide dynamic range. This filter is half dark and half clear with a gradual blend through the middle. It can be a very useful tool to help limit bright light from part of the scene (such as the sky) while allowing dark areas to record normally (such as the ground), so that the sensor can better handle the tonal range of the scene.

Photo Tip!
You can expose a scene with a wide dynamic range to get excellent silhouettes. Silhouettes are dramatic pictures that look great if you keep the silhouettes dark from underexposure while you keep the background (such as a sunlit hillside) bright, but with detail and color. Check your histogram and LCD review to be sure you got the right exposure. You can always darken the silhouettes to pure black in an image-processing program such as Photoshop Elements.